AutoOps is an easy-to-use and easy-to-install online scheduling tool. This installation guide is intended to guide you through the installation process on many of the well-known web builder platforms. Please let us know at support@autoops.com if you have any questions or have a web builder platform that is not included in this guide. Below you can find documentation that will help you add AutoOps to your website. Depending on the level of customization you require, this process can range from adding a single <script> tag and a CSS class to building out a set of onclick calls and optional event listeners.
If you have any questions please reach out to your AutoOps Account (or hello@autoops.com)
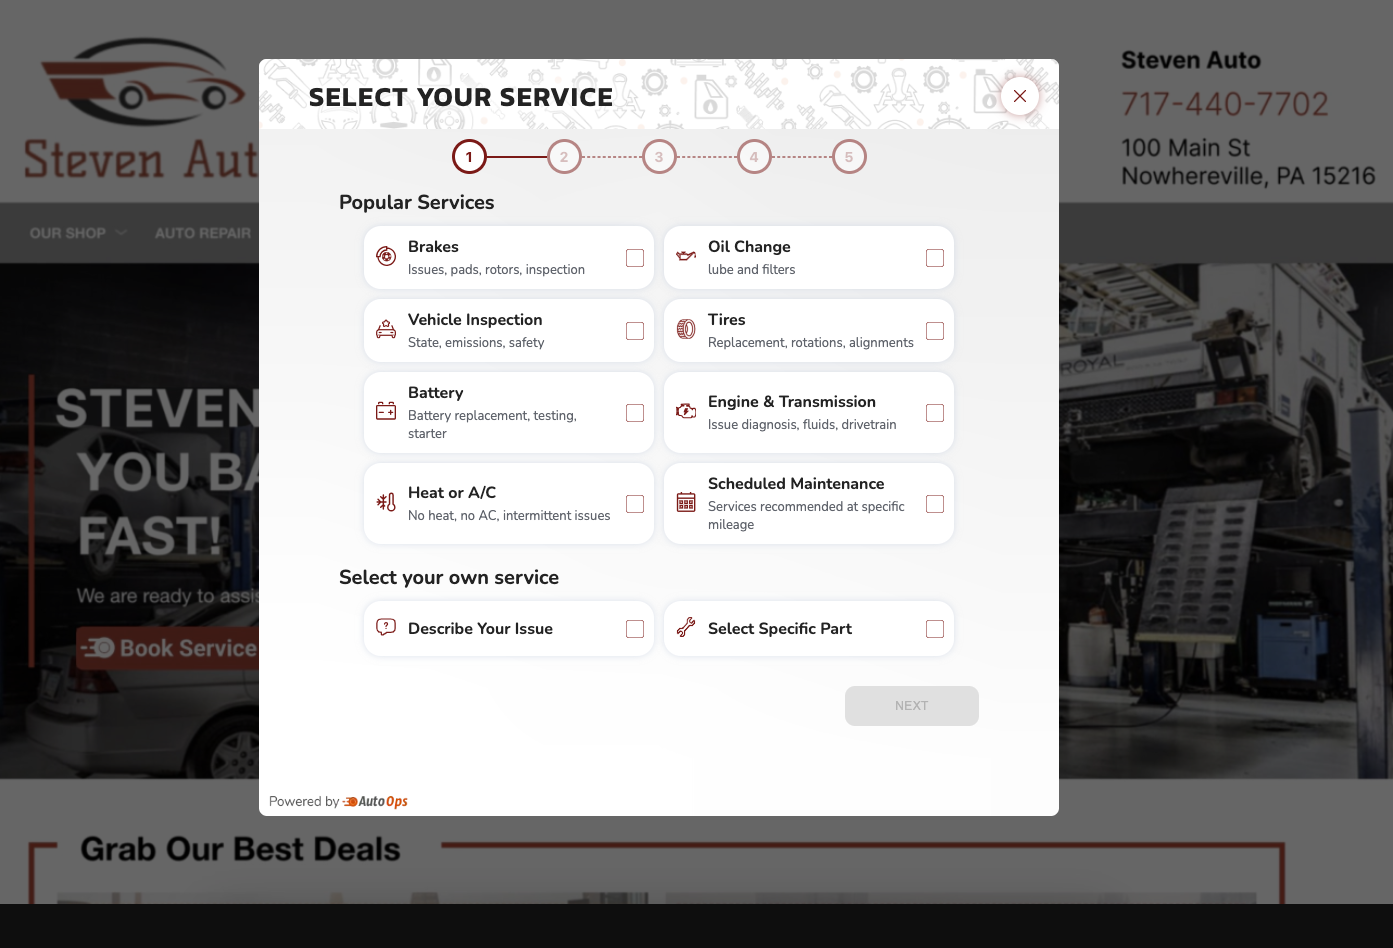
Popup mode mode causes AutoOps Online Scheduler to be “opened” by a Schedule Appointment button or link and appear on top of the website and focuses the user’s attention to the scheduling experience. AutoOps recommends using the Pop-up Mode. This mode works best on a mobile experience (phone) and provides the best engagement with the customer - keeping the customer focused on the scheduling experience.
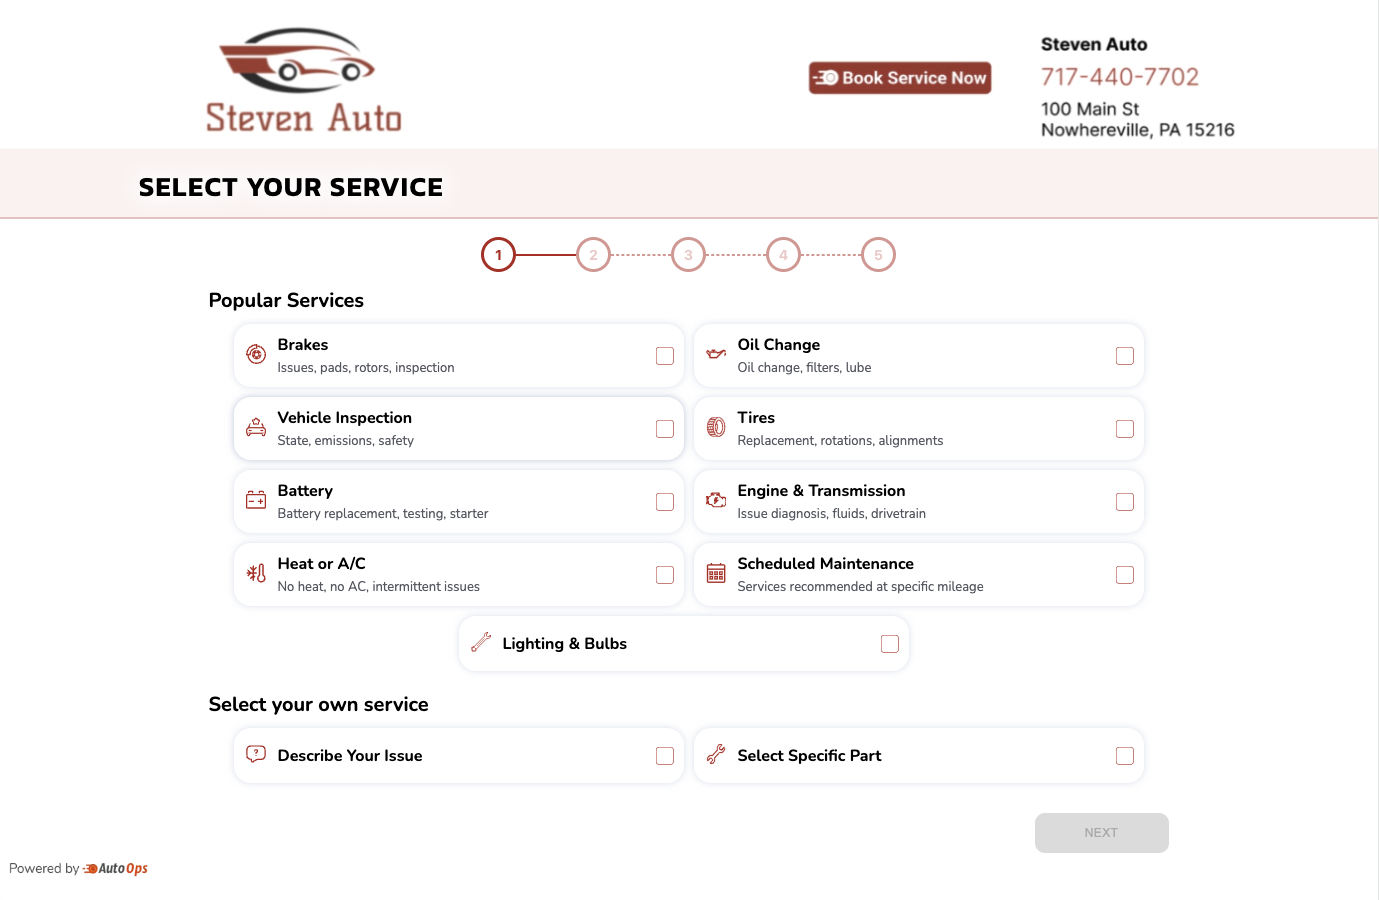
Embedded mode embeds the AutoOps Online Scheduler into the webpage. The embedded mode is similar to how an online form appears on a website. While AutoOps doesn’t recommend this as a primary scheduling experience, it can be useful and desired in certain web page experiences.
Note: The Popup Mode and Embedded Mode can be used on the same web page. See below for more information.
AutoOps uses a single HTML <script> tag to “install” AutoOps on a website. This <script> tag needs to be included in the <body> area of the website to work properly. The AutoOps <script> tag needs to be present on every page that you want to have AutoOps. Most web builder platforms have the ability to include some code on every page so that you do not have to install the AutoOps code manually on every page. We highly recommend using this approach. AutoOps recommends inserting the main AutoOps script into your website as the last element within the <body> tag.
Ensure the AutoOps script only gets included once per page.
Note: You must retrieve your data-api-key from the AutoOps Dashboard
For Popup Mode - use this script tag
<!-- Last element within your <body> tag -->

<script
  id="portal-scripts"
  data-api-key="the shop specific api key"
  data-google-analytics-enabled="true"
  data-delayed-load="true"
  src="https://portal.autoops.com/portal-scripts.js"
></script>
For Embedded Mode - use this script tag
<!-- Last element within your <body> tag -->

<script
  id="portal-scripts"
  src="https://portal.autoops.com/portal-scripts.js"
  data-google-analytics-enabled="true"
  data-loading-color="000000"
  data-embed-mode="true"
  data-api-key="the shop specific api key"
></script>
The second step when using Embedded Mode… Place the following tag in the location on the web page you want the AutoOps scheduler to appear. This may require using an HTML block or access to the HTML of a web page.
<div id="ao-embed-id"></div>
Note: To use the Popup Mode and Embedded Mode on the same web page, include both the above scripts and follow the remaining instructions.
A few notes about the AutoOps <script> tag:
<script> tag should be included near the bottom of the <body> tag. Many website builder platforms refer to this as the “footer” area. “Footer” is used to describe the area of the web page right before the closing body tag </body>.<script> tag includes a few parameters:data-api-key = This is the API Key that uniquely identifies the specific shop. Please use caution and be sure to use the correct API Key. This key is available in the Site Setup area of the AutoOps Dashboard.data-google-analytics-enabled = This option can be set to “true” or “false”. This option indicates whether AutoOps should fire/emit events to the locally enabled Google Analytics tracker on the webpage. When AutoOps is installed and this option set to “true”, then Google Analytics will begin to receive events from AutoOps. More information about the specific events can be found here.data-delayed-load (Pop-up mode only) = This option is used to delay the loading of most of the AutoOps script to ensure the fastest page load times. The AutoOps script will load on the first AutoOps.show() method execution.data-embed-mode (Embedded mode only) = This option is used to indicate that Embedded Mode is being used. Set this value to “true” to use Embedded Mode.data-loading-color = (Embedded mode only) = This option sets the background color for the embedded AutoOps window while the components are loading.Note: Some of the following information requires some HTML/Javascript experience. If you are not comfortable with this, don’t hesitate to contact us at support@autoops.com and we can help!
Launching the AutoOps Online Scheduling experience can be accomplished in a number of ways. AutoOps can be shown using a hyperlink or button. The general requirement is to be able to execute this JavaScript method: AutoOps.show();
onclick handler to a button:<!-- Example onclick button -->
<button type="button" onclick="AutoOps.show()">Schedule Appointment</button>
onclick handler to buttons, links, etc. If this is the case, you may need to use an alternate approach to attaching the onclick event to buttons or links. **The following code snippets can be included with the main AutoOps script to support a variety of ways that you may want or need to be to launch the AutoOps Online Scheduler:<!-- CSS Class Name Example -->
<!-- This example attaches the AutoOps.show() method to all HTML elements that have the CSS Class Name = `ao_button` -->
<script>
const elems = document.querySelectorAll(".ao_button");
elems.forEach((elem) => {
elem.addEventListener("click", (e) => {
e.preventDefault();
AutoOps.show();
});
});
</script>
<!-- Page Name/URL Example -->
<!-- This example add the AutoOps.show() method to all HTML elements that have a specific target page/URL -->
<script>
  function attachAOCode() {
    const apptBtns = document.querySelectorAll("a[href='https://www.yourwebsite.com/schedule-an-appointment']");
    for (const apptBtn of apptBtns) {
      apptBtn.href = "";
      apptBtn.addEventListener("click", (e) => {
        e.preventDefault();
        AutoOps.show();
      });
    }
  }
  attachAOCode()
</script>
https://your-website.com?ao_auto_show=true
For shops that have multiple locations under a single company or brand, AutoOps supports a Multi-Shop Organization (MSO) scheduling experience. This includes the ability for a customer to select from multiple shops guided by a helpful map. The AutoOps installation and launch for this is slightly different than a single shop experience.
The MSO AutoOps Installation Script - be sure to place before the closing
<script
  id="portal-scripts"
  data-api-key="key_cl_grp_[code provided by AutoOps]"
  src="https://portal.autoops.com/portal-scripts.js"
  google-analytics-enabled="true"
></script>
Launching the MSO Scheduling Experience - this includes the shop/map selection
The AutoOps MSO scheduling experience is launched using the same method earlier in this document. The AutoOps.show() method will cause the MSO scheduler to appear.
<button type="button" onclick="AutoOps.show()">
  Schedule Appointment for One of Steve's Auto Locations
</button>
Launching a single shop that is part of a MSO
When using the AutoOps MSO configuration, there may be places within a website or other calls-to-action where it may be more appropriate to launch a specific location’s scheduling experience. e.g. A specific location page on a website, or an email campaign for a specific location. To launch a specific location’s scheduling experience, a parameter is using to indicate which location should be used:
<button
  type="button"
  onclick="AutoOps.show({ clientKey: '[provided by AutoOps]' ]})"
>
  Schedule Appointment for the Steve's Auto in Lancaster
</button>
Launching a single shop using a URL
You can launch a single location in an MSO setup using a URL. Just add the ao_client_key parameter to the URL:
https://your-website.com?ao_auto_show=true&**ao_client_key=your_location_clientkey**
Remember to also include the ao_auto_show=true so that AutoOps automatically opens to the specific location. Be sure to replace the “your_location_clientKey” with the client key from the location you want to launch.
AutoOps will provide the specific “keys” for the various locations within the MSO.
Watch a video - Installing on WordPress:
https://www.loom.com/share/00c6c187500940aca63f324f98105cbf?sid=047c32c4-e311-47a0-b04e-d8ed857c7350
WordPress is one of the most popular web builder/design platforms used by many companies, marketing teams, and individuals. The following instructions can be used to guide your installation on WordPress.
The Main AutoOps Script
For WordPress, including the AutoOps main <script> is best accomplished using a WordPress plugin like WPCode or CodeSnippets. A number of plugins support inserting HTML code into your website. Here is an example of using the WPCode/Code Snippets Plugin:
The WPCode plugin:

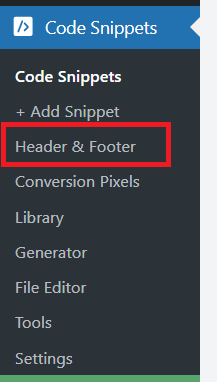
The WPCode/Code Snippets Menu:
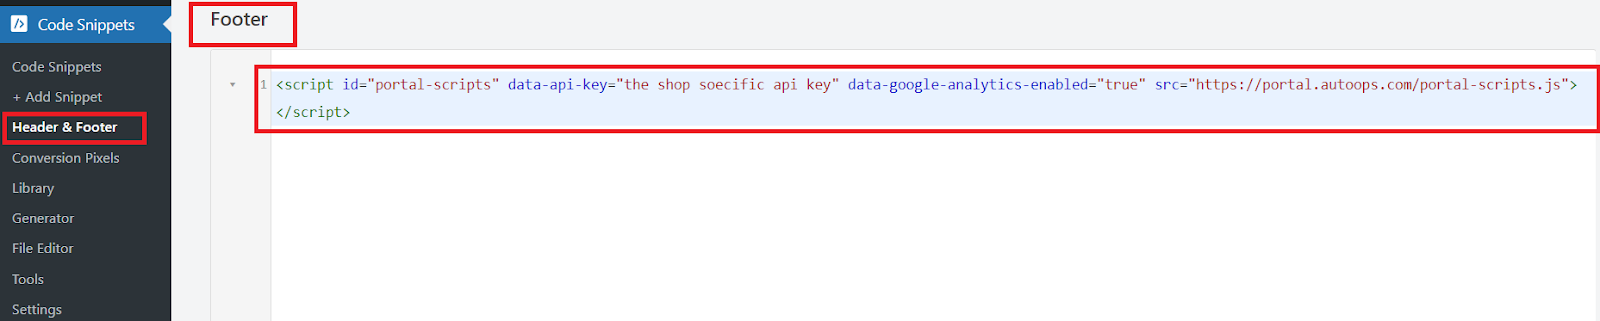
Adding a WPCode/Code Snippet Footer:
There are many WordPress plugins that support installing code into the <body> tag of the website. Please contact us at support@autoops.com if you have any questions about using a WordPress plugin.
Some WordPress page builders may support adding an onclick handler to a button or a link. If you are able to set an onclickevent for your buttons or links, then set the onclickevent to:
AutoOps.show();
In our experience, not many WordPress page builders support this.
In the event that your WordPress installation does NOT support this, there are a couple other strategies you can use.
Showing AutoOps - Using the CSS Class Name
With some additional code, you can show the AutoOps Online Scheduler by simply applying a CSS Class to a link or a button.
STEP 1 - Set the CSS Class name for a button or link to “ao_button”. (Note: Any unique CSS Class name can be used. If you use a different CSS Class name other than “ao_button”, please update the code below accordingly.
Note: Popular page designer plugins like Elementor, DIVI, etc. support setting a CSS Class on a link or a button.
STEP 2 - Add the additional code - Install this BELOW the Main AutoOps <script> Tag
<script>
  const elems = document.querySelectorAll(".ao_button");
  elems.forEach((elem) => {
    elem.addEventListener("click", (e) => {
      e.preventDefault();
      AutoOps.show();
    })
  });
</script>
Showing AutoOps - Using a Page/Navigation URL
With some additional code, you can show the AutoOps Online Scheduler by setting the target page/URL to a specific page. Some menus within a WordPress site are not able to set a CSS Class and can only use a target page/URL.
STEP 1 - Create or identify a target page/URL that can be used to point buttons or links. This can be an existing Appointment page or one that you create. Set the target page/url on all the links or buttons to a page on the website that you want to launch the AutoOps Online Scheduler. (Note: A target page does not have to exist, but it is good practice to create an actual page that the button or link can point to. Please update the code below to the page where you set the buttons or links.)
STEP 2 - Add the additional code - Install this BELOW the Main AutoOps <script> Tag
// This code will look for any links that point to a specific URL and will
attach the AutoOps OnClick event to show the AutoOps scheduler.

<script>
  function attachAOCode() {
    const apptBtns = document.querySelectorAll("a[href='***https://www.yourwebsite.com/schedule-an-appointment***']");
    for (const apptBtn of apptBtns) {
      apptBtn.href = "";
      apptBtn.addEventListener("click", (e) => {
        e.preventDefault();
        AutoOps.show();
      });
    }
  }
  attachAOCode()
</script>
Other Important Notes Using WordPress
Some cache plugins or others have a setting to compress or “minify” Javascript files.
AutoOps must be specifically excluded from this functionality to work.
Wix is a popular website builder. With the way the Wix creates web pages, there are a few things that can make adding AutoOps to the website tricky - but the following instruction will help.
Watch an installation video:
https://www.loom.com/share/72cbec167a034f0cab041a59cfe377d9?sid=3af8bf78-19d8-454f-9c4b-cca30b2498c5
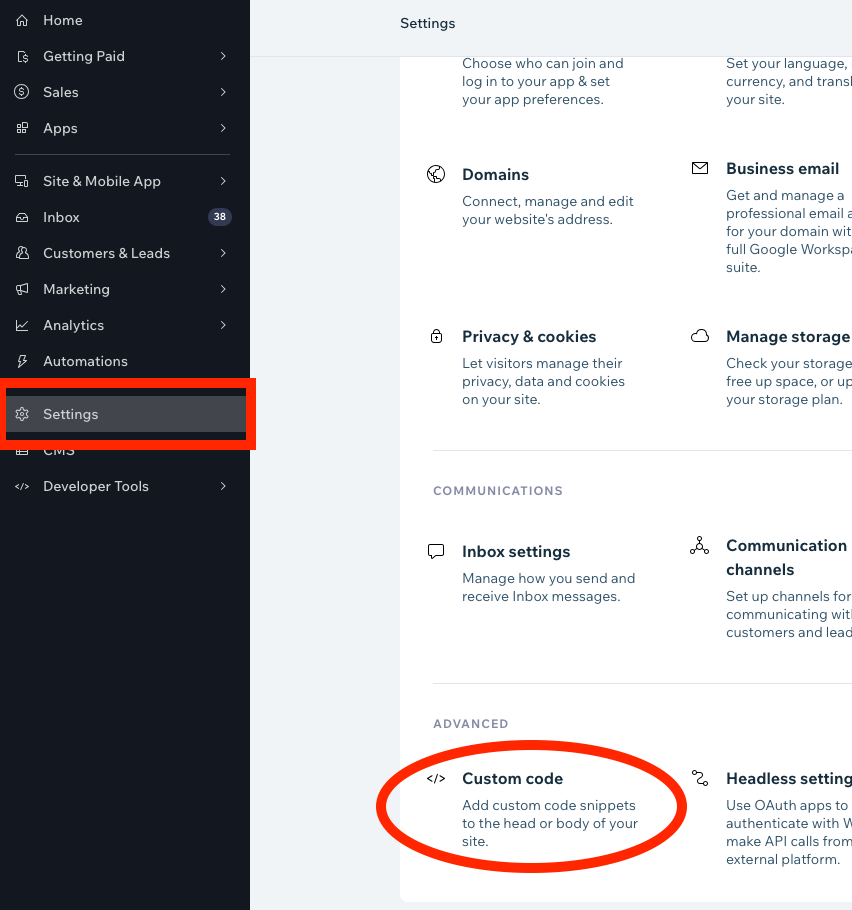
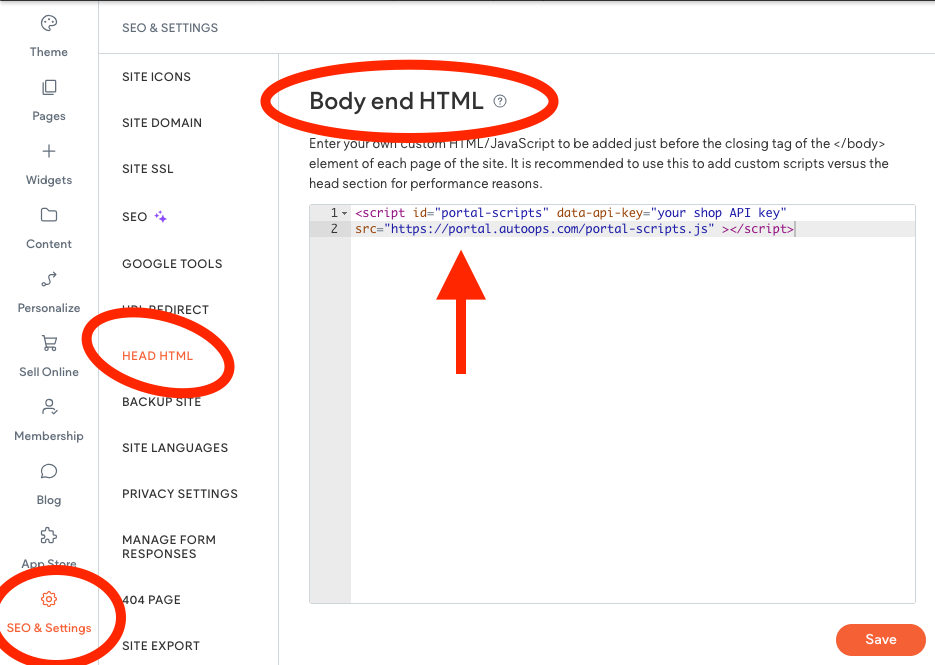
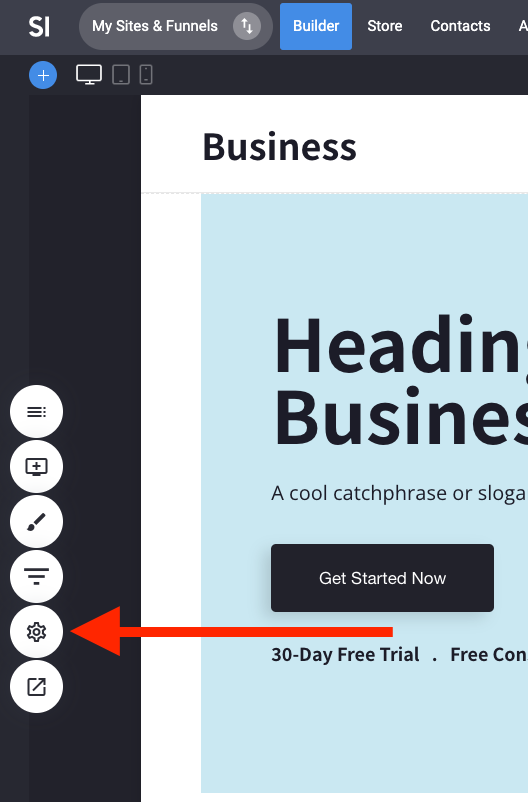
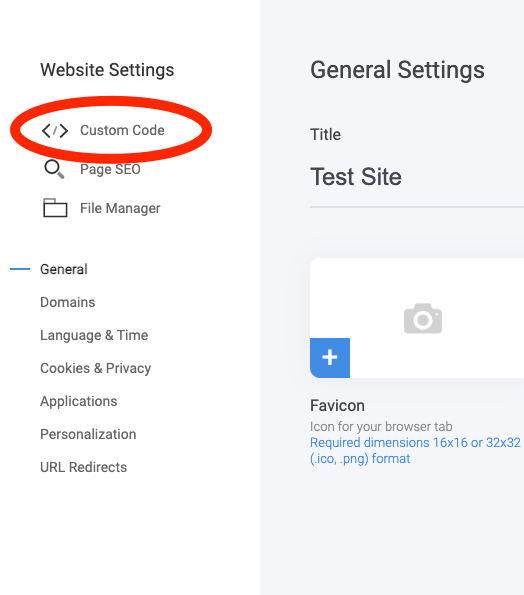
STEP 1 - Log into Wix - click Settings - click Custom Code
STEP 2 - Add Custom Code
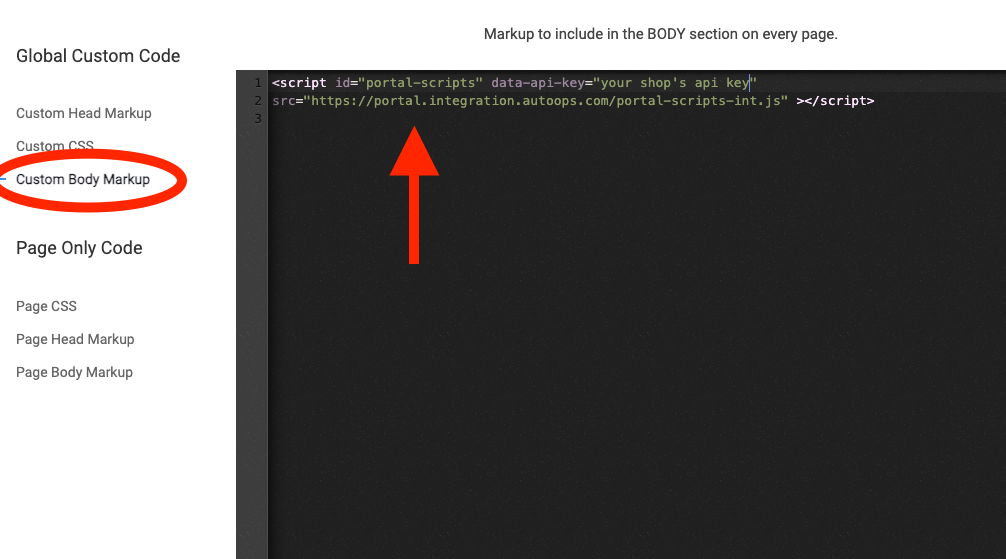
Create a custom code section using the following settings:
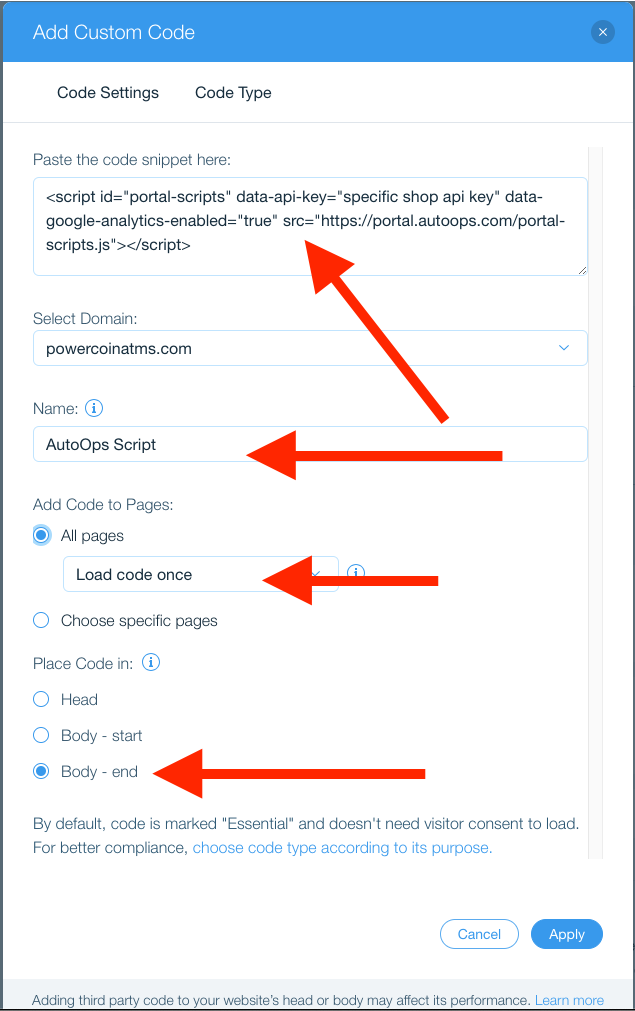
Here is the full code in the above image:
<script
  id="portal-scripts"
  data-api-key="***your shop specific api key***"
  data-google-analytics-enabled="true"
  src="[https://portal.autoops.com/portal-scripts.js](https://portal.autoops.com/portal-scripts.js)"
></script>
<script>
  function attachAOCode() {
    const apptBtns = document.querySelectorAll("a[href='***https://www.yourwebsite.com/your appointment page***']");
    for (const apptBtn of apptBtns) {
      apptBtn.href = "";
      apptBtn.addEventListener("click", (e) => {
        e.preventDefault();
        AutoOps.show();
      });
    }
  }
</script>
Then create an additional custom code section named “AutoOps Activate” using the following settings:
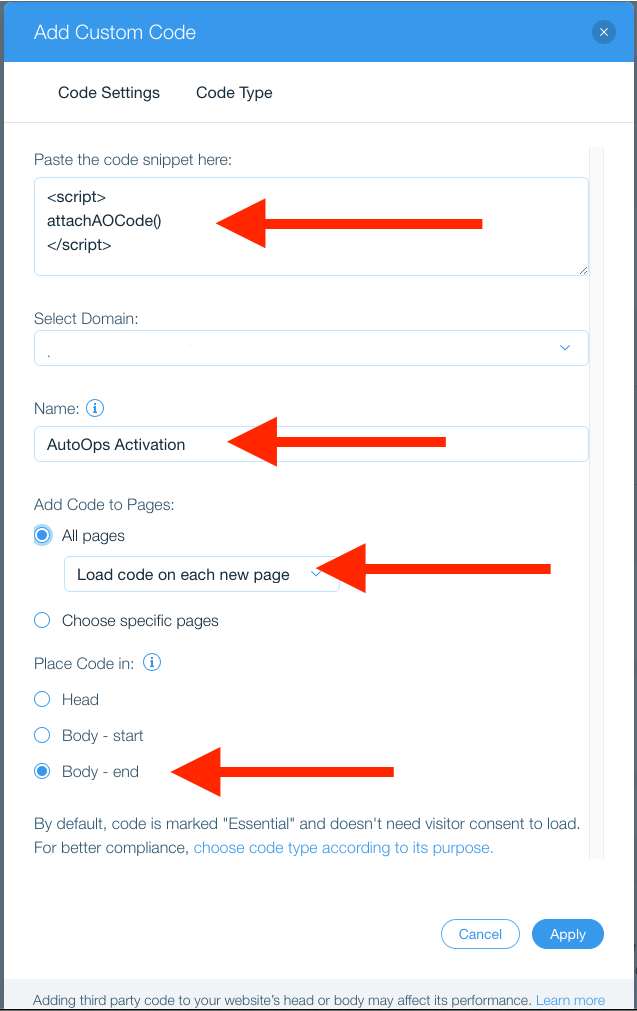
Note: Pay special attention to the “Load code on each new page” setting.
The code above is:
<script>
  attachAOCode();
</script>
STEP 3 - Set any button or link to the page specified in the code above.
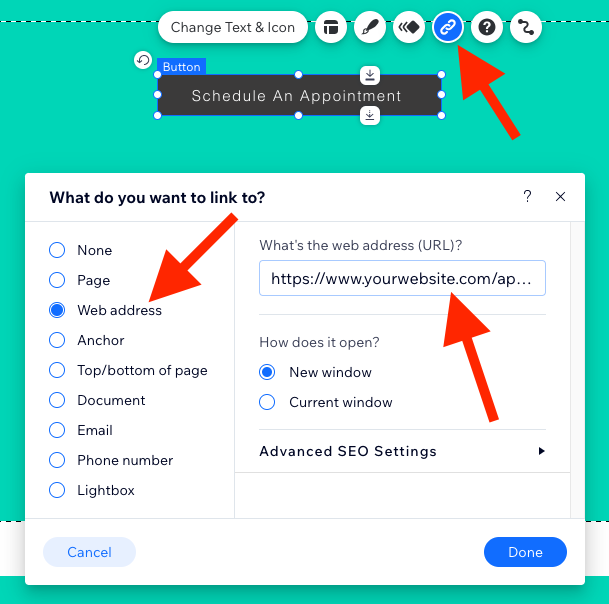
Alternatively, you can also use the “Page” option above to indicate a specific page on your website. Keep in mind that the AutoOps code will override this setting so the button/link will NOT actually navigate to this page.
Let us know if you have any issues by reaching out at support@autoops.com!
Watch an installation video showing you how install AutoOps on a Squarespace website:
https://www.loom.com/share/67fea309a784402aa1acf9dbeebb4575?sid=09a83374-a854-4591-84e6-e9afb20c58be
STEP 1 - Add the AutoOps Main Script
<script
  id="portal-scripts"
  data-api-key="***your shop specific api key***"
  data-google-analytics-enabled="true"
  src="[https://portal.autoops.com/portal-scripts.js](https://portal.autoops.com/portal-scripts.js)"
></script>
STEP 2 - OPTION 1 - Add CODE Buttons, Links to launch AutoOps
To launch the AutoOps Online Scheduling tool, you will need to include a button or link. Within Squarespace, you can include an HTML Code block:
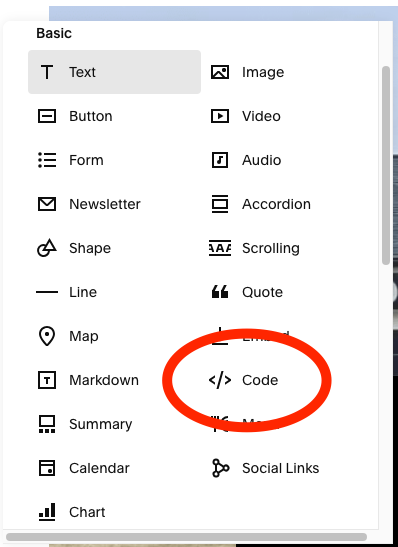
In the HTML Code block, you can include HTML button or link with something like:
<button type="button" onclick="AutoOps.show()">Schedule Appointment</button>
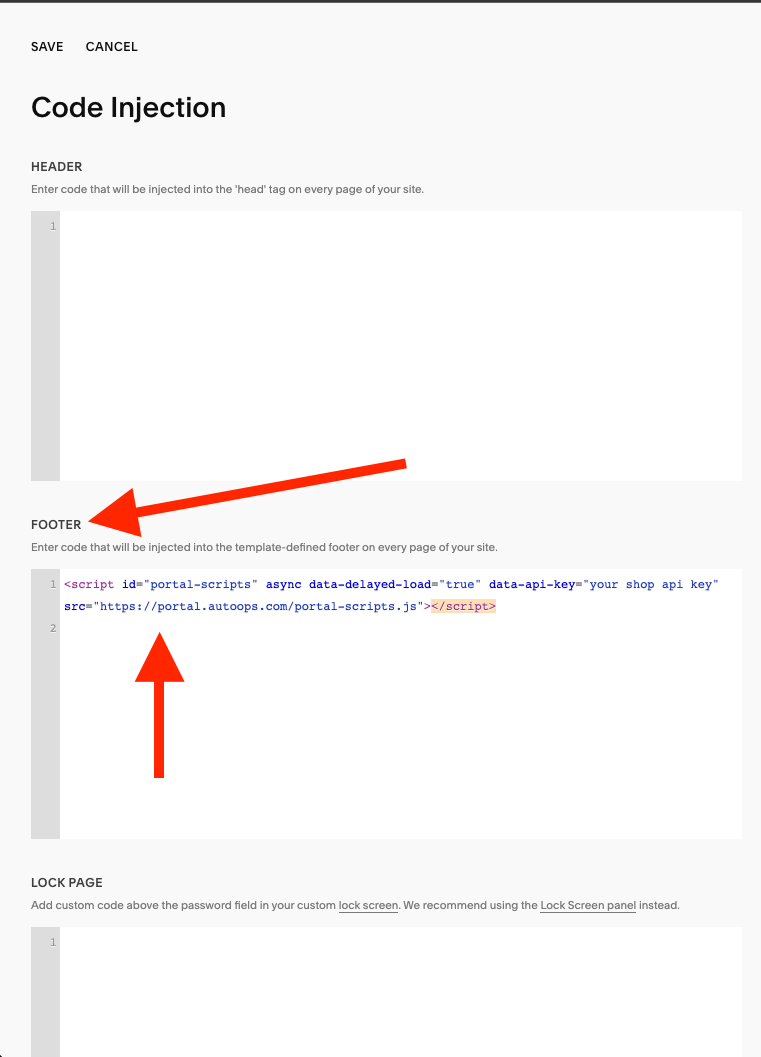
Note: In Squarespace, you can include a button in the Header area of the website. This button can be activated to launch AutoOps by including the following code in the Code Injection area of Squarespace directly below the main AutoOps script that was added in Step 1.
<script>
  document.querySelector(".header-actions-action--cta").addEventListener("click", (e) => {
    e.preventDefault();
    AutoOps.show();
  })
</script>
Step 2 - OPTION 2 - Use Squarespace built-in buttons
To launch AutoOps using the built-in buttons in Squarespace, insert the following code in the Footer area in the Code Injection section back in Step 1. Insert this code directly below the main AutoOps script.
<script>
  function attachAOCode() {
    const apptBtns = document.querySelectorAll("a[href='**https://www.yourwebsite.com/schedule-an-appointment**']");
    for (const apptBtn of apptBtns) {
      apptBtn.href = "";
      apptBtn.addEventListener("click", (e) => {
        e.preventDefault();
        AutoOps.show();
      });
    }
  }
  attachAOCode()
</script>
STEP 1 - Add the AutoOps Main Script
STEP 2 - Create or identify a target page/URL that can be used to point buttons or links. This can be an existing Appointment page or one that you create. Set the target page/url on all the links or buttons to a page on the website that you want to launch the AutoOps Online Scheduler. (Note: A target page does not have to exist, but it is good practice to create an actual page that the button or link can point to. Please update the code below to the page where you set the buttons or links.)
STEP 3 - Add the additional code - Install this BELOW the Main AutoOps <script> tag that was added in Step 1
<script>
  function attachAOCode() {
    const apptBtns = document.querySelectorAll("a[href='**https://www.yourwebsite.com/schedule-an-appointment**']");
    for (const apptBtn of apptBtns) {
      apptBtn.href = "";
      apptBtn.addEventListener("click", (e) => {
        e.preventDefault();
        AutoOps.show();
      });
    }
  }
  attachAOCode()
</script>
Here is a video that shows you how to install AutoOps on your Shopify Store/Website
https://www.loom.com/share/56eb2ed73d0249a2a9284b86d6e34bbe
https://www.loom.com/share/56eb2ed73d0249a2a9284b86d6e34bbe?sid=776f9193-96ef-48b5-bcd4-9fc25ac3d995
Here is the code referenced in this video:
<script>
  function attachAOCode() {
    const apptBtns = document.querySelectorAll("a[href='**https://www.yourwebsite.com/schedule-an-appointment**']");
    for (const apptBtn of apptBtns) {
      apptBtn.href = "";
      apptBtn.addEventListener("click", (e) => {
        e.preventDefault();
        AutoOps.show();
      });
    }
  }
  attachAOCode()
</script>
Please contact us at support@autoops.com and we can help with your Shopify installation!
When launching AutoOps, you can optionally provide tracking fields that will be fed all the way through AutoOps. This allows for attribution, metrics, and tracking. Below is the standard list of tracking fields:
utm_source
utm_medium
utm_campaign
utm_term
utm_content
gclid
gclsrc
wbraid
gbraid
fbclid
yclid
msclkid
ttclid
ao_leadSource
ao_campaign
ao_affiliate
ao_promo
ao_coupon
ao_custom1
ao_custom2
ao_custom3
If any of the above data fields are present in the URL, they will automatically be stored in AutoOps.
These field values can be optionally set or overridden using the onclick handler as shown below.
Below are some example URLs that utilize some of the standard tracking fields:
Note: The ao_auto_show parameter can be paired with tracking fields!
https://your-website.com?ao_auto_show=true&ao_promo=summer2023
https://your-website.com?fbclid=XXXX
Providing tracking fields via JavaScript requires you to use the onclick handler to open AutoOps.
<!-- Example onclick button -->
<button
  type="button"
  onclick="AutoOps.show({ ao_coupon: 'free-oil-change-with-inspection' })"
>
  Schedule Appointment
</button>
// Example dynamic button
document.getElementById("myButton").onclick = () => {
  AutoOps.show({ ao_custom1: user.id });
}
You can open AutoOps with issues pre-selected. You can even skip users right over issue selection if desired.
The idOrKey fields should match one of the titles in your issue tree.
// Pre-select issues without skipping
AutoOps.show({
  prefill: {
    disableAutoSkip: true,
    services: [ { idOrKey: 'tire' } ],
  },
});

// Pre-select and skip issues (user will start on phone screen)
AutoOps.show({
  prefill: {
    services: [
      { idOrKey: 'tire' }
      { idOrKey: 'brake', customerNotes: 'Some customer brake notes' }
    ],
  },
});

// MSO pre-select location without skipping
AutoOps.show({
  clientKey: 'my-shop-downtown',
  disableAutoSkip: true,
});

// MSO pre-select location and issues without skipping
AutoOps.show({
  clientKey: 'my-shop-downtown',
  disableAutoSkip: true,
  prefill: {
    services: [ { idOrKey: 'tire' } ],
  },
});

// MSO pre-select and skip location, pre-select issues without skipping
AutoOps.show({
  clientKey: 'my-shop-downtown',
  prefill: {
    disableAutoSkip: true,
    services: [ { idOrKey: 'tire' } ],
  },
});

// MSO pre-select and skip location and issues (user will start on phone screen)
AutoOps.show({
  clientKey: 'my-shop-downtown',
  prefill: {
    services: [ { idOrKey: 'tire' } ],
  },
});
In addition to service details, you can provide other data that can be pre-filled.
AutoOps.show({
  prefill: {
    disableAutoSkip: false, // Optional - by default users will be skipped forward as much as possible
    additionalNotes: 'Some internal notes here', // Optional
    services: [ // Optional
        {
          idOrKey: 'tire', // Required - should match an issue tree title
            customerNotes: 'Some customer tire notes', // Optional
        },
    ],
    customer: { // // Optional
        firstName: 'John', // Required
        lastName: 'Doe', // Required
        phone: '+12223334444', // Required - must be in +1 format
        email: 'john.doe@autoops.com', // Optional
    },
    vehicle: { // Optional
        year: 2001, // Required
        make: 'Volkswagen', // Required
        model: 'Golf', // Required
    },
  }
});
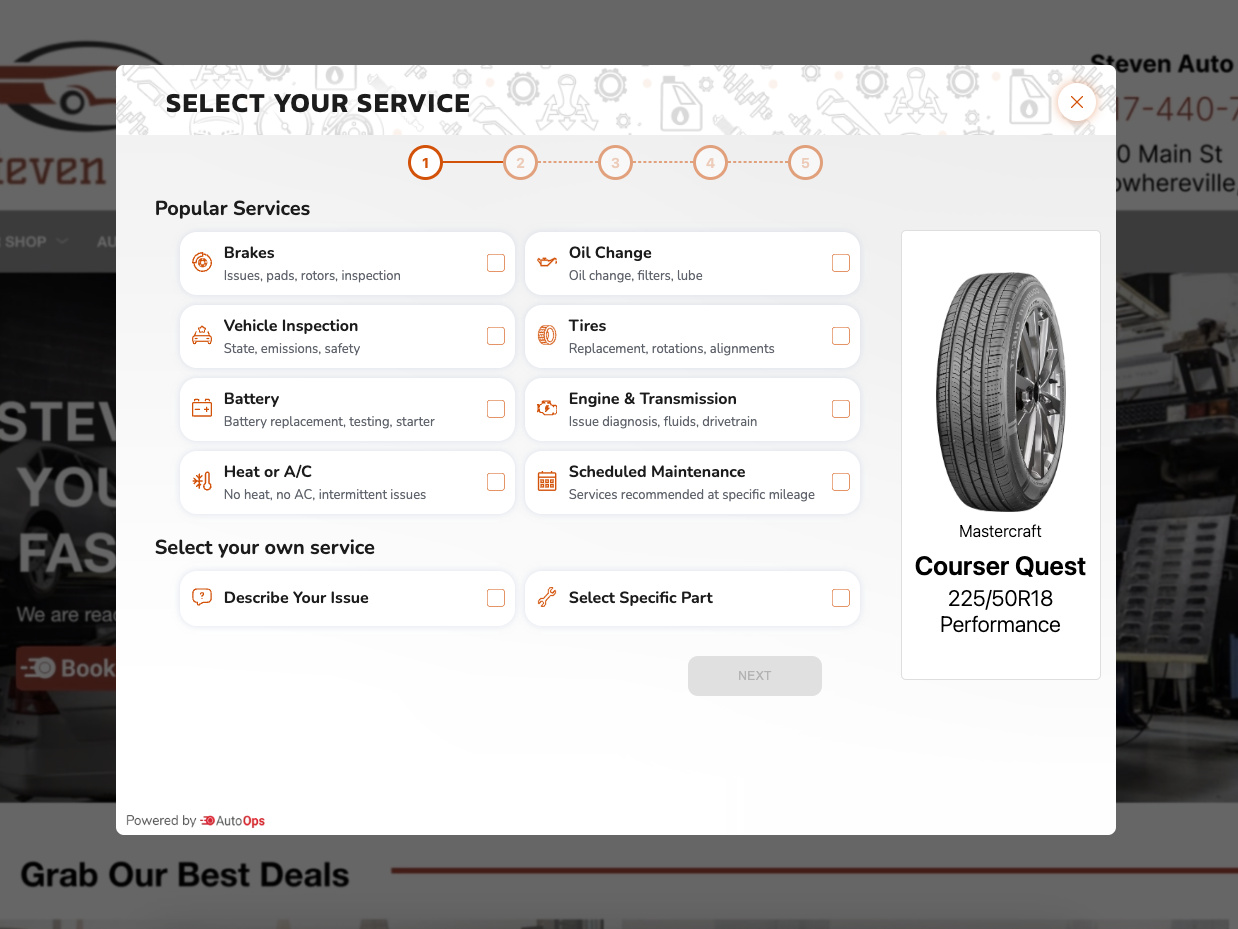
AutoOps allows you to launch it with a side panel. This allows you to showcase specific products or special offerings.
// Show a promotion
AutoOps.show({
  settings: {
    sidePanel: {
      imageUrl:
        'https://api.autoops.com/docs/files/side-panel-promo-example.png',
      description: 'Free Inspections All Month Long!',
    },
  },
});

// Show a tire product, pre-select the tire issue, and add the product as additional notes
AutoOps.show({
  prefill: {
    disableAutoSkip: true,
    services: [{ idOrKey: 'tire' }],
    additionalNotes: 'Courser Quest 225/50R18 Performance',
  },
  settings: {
    sidePanel: {
      imageCaption: 'Mastercraft',
      imageUrl:
        'https://api.autoops.com/docs/files/side-panel-tire-example.jpg',
      title: 'Courser Quest',
      description: '225/50R18 Performance',
    },
  },
});
If desired, you can listen in for specific events as users navigate through AutoOps. Below is the list of supported events:
ao-opened
ao-location-selected
ao-issue-completed
ao-customer-completed
ao-vehicle-completed
ao-deferred-work-completed
ao-waiter-drop-off-completed
ao-address-completed
ao-transportation-completed
ao-date-selected
ao-appointment-booked
ao-closed
ao-button-click
ao-all-events
Some events provide additional data as documented below:
// ao-customer-completed
{
  customerData: {
    firstName: 'John',
    lastName: 'Doe',
    phone: '+17173334444',
    email: null,
  }
}

// ao-appointment-booked
{
  clientId: 'cl_rods',
  sourceTracking: {
    ao_campaign: 'spring2025',
    bookingPage: 'someshop.com',
  },
  customerData: {
    phone: '+17173334444',
    firstName: 'John',
    lastName: 'Doe',
    email: null,
  },
  vehicleData: {
    year: 2002,
    make: 'Honda',
    model: 'Civic',
    license: null,
    licenseRegion: null,
    vin: null,
  },
  addressData: {
    line1: '123 Main St',
    locality: 'Lancaster',
    region: 'PA',
    postalCode: '17602',
  },
  promisedWindowStart: '2025-05-14T13:00:00.000Z',
  promisedWindowEnd: '2025-05-14T14:00:00.000Z',
  timezone: 'US/Eastern',
  issues: [
    {
      issueDescription: [
        'Brakes',
        'I feel pulsating when I press the brake pedal',
        'Front brakes',
      ],
      customerNotes: null,
    },
  ],
}

// ao-button-click
{
  type: "ao-button-click",
  buttonDescription: "Select issue: Vehicle Inspection",
  componentName: "IssueSelect",
  additionalData: {
    issueTitle: "Vehicle Inspection",
    selectedIssuesCount: 1
  }
}
Below are some examples of setting up event listeners:
<script>
  AutoOps.onEvent('ao-opened', () => {
    // Google analytics tracking code
  });

  AutoOps.onEvent('ao-appointment-booked', (data) => {
    // Call to custom API
  });
</script>
ao-all-events
This is a catch-all event that fires for every single event triggered within the AutoOps interface. It is very verbose and therefore useful for analytics or diagnostic purposes where you want to track all user actions without subscribing to each event individually. The payload includes a minimum of a type field which is the name of the specific event triggered.
In addition to the JavaScript event listeners, AutoOps can provide similar events in the form of HTTP webhooks. This would involve getting setup with the AutoOps Public API. If you’re interested in this option please reach out to your AutoOps rep (or hello@autoops.com).